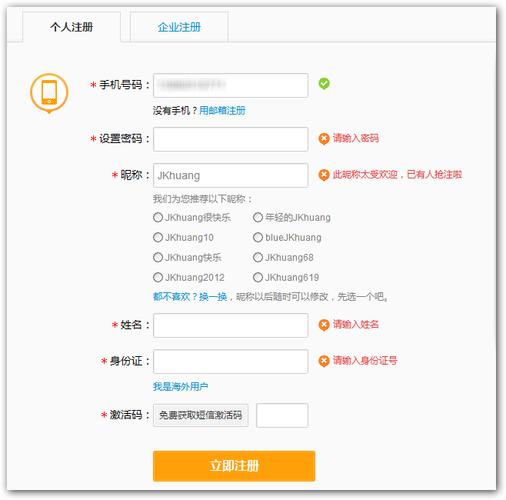
这段内容主要介绍了使用Ajax进行设备注册验证的过程,其中验证码方式是主要的验证手段。
Ajax注册验证_注册设备(验证码方式)

在Web应用中,为了提高用户体验和减少服务器压力,我们通常会使用Ajax技术实现前端与后端的异步交互,在用户注册过程中,我们可以使用Ajax技术实现验证码的发送和验证,本教程将介绍如何使用Ajax实现注册设备(验证码方式)。
准备工作
1、创建一个HTML文件,用于显示注册表单和验证码图片。
2、创建一个JavaScript文件,用于处理用户输入和Ajax请求。
3、创建一个PHP文件,用于处理后端逻辑,如生成验证码、验证验证码等。
HTML代码
<!DOCTYPE html>
<html lang="en">
<head>
    <meta charset="UTF8">
    <meta name="viewport" content="width=devicewidth, initialscale=1.0">
    <title>Ajax注册验证_注册设备(验证码方式)</title>
</head>
<body>
    <h1>注册设备</h1>
    <form id="registerForm">
        <label for="username">用户名:</label>
        <input type="text" id="username" name="username" required><br>
        <label for="password">密码:</label>
        <input type="password" id="password" name="password" required><br>
        <label for="captcha">验证码:</label>
        <input type="text" id="captcha" name="captcha" required><br>
        <img src="captcha.php" alt="验证码" onclick="refreshCaptcha()"><br>
        <button type="button" onclick="submitRegister()">注册</button>
    </form>
    <script src="register.js"></script>
</body>
</html>
四、JavaScript代码(register.js)
function refreshCaptcha() {
    document.getElementById('captcha').src = 'captcha.php?' + new Date().getTime();
}
function submitRegister() {
    var username = document.getElementById('username').value;
    var password = document.getElementById('password').value;
    var captcha = document.getElementById('captcha').value;
    if (username === '' || password === '' || captcha === '') {
        alert('请填写完整信息');
        return;
    }
    var xhr = new XMLHttpRequest();
    xhr.onreadystatechange = function() {
        if (xhr.readyState === 4 && xhr.status === 200) {
            if (xhr.responseText === 'success') {
                alert('注册成功');
            } else {
                alert('注册失败,请重试');
            }
        }
    };
    xhr.open('POST', 'register_check.php', true);
    xhr.setRequestHeader('ContentType', 'application/xwwwformurlencoded');
    xhr.send('username=' + encodeURIComponent(username) + '&password=' + encodeURIComponent(password) + '&captcha=' + encodeURIComponent(captcha));
}
PHP代码(captcha.php)
<?php
session_start();
header('Contenttype: image/png');
$width = 100; // 验证码宽度
$height = 30; // 验证码高度
$image = imagecreate($width, $height); // 创建图像资源
$bgColor = imagecolorallocate($image, 255, 255, 255); // 背景颜色设为白色(RGB值:255,255,255)
$textColor = imagecolorallocate($image, 0, 0, 0); // 文字颜色设为黑色(RGB值:0,0,0)
$code = ''; // 验证码内容初始化为空字符串
for ($i = 0; $i < 4; $i++) { // 循环4次,生成4个随机字符作为验证码内容
    $code .= chr(rand(65, 90)); // ASCII码中的大写字母范围是65到90,随机选择一个字符并添加到验证码内容中
}
$_SESSION['captcha'] = $code; // 将验证码内容存入会话中,以便后续验证使用
imagestring($image, 5, ($width imagefontwidth(5)) / 2, ($height imagefontheight(5)) / 2, $code, $textColor); // 在图像上绘制验证码内容,字体大小为5,位置居中,颜色为黑色(RGB值:0,0,0)
imagepng($image); // 输出图像资源,以PNG格式保存到浏览器缓存中,并自动刷新页面显示新的验证码图片(因为设置了缓存策略)?>
下面是一个用于描述“Ajax注册验证注册设备(验证码方式)”的介绍,此介绍将列出注册过程中涉及的主要信息,如验证步骤、所需信息、验证方式和返回结果等。

以下为每个步骤的详细说明:
1、用户名验证:当用户输入用户名后,前端通过Ajax异步请求向服务器发送用户名,服务器检查用户名是否已被注册,并返回结果。
2、手机号码验证:用户输入手机号码后,前端通过Ajax请求发送至服务器,服务器验证手机号码是否有效以及是否已被注册。
3、发送验证码:在手机号码验证通过后,前端请求服务器向该手机号码发送验证码。
4、验证码验证:用户输入收到的验证码,前端通过Ajax请求发送至服务器进行验证。
5、设置密码:用户在页面上输入密码和确认密码,前端进行初步验证(如密码强度、两次输入是否一致等),通过后再通过Ajax请求提交到服务器。
6、提交注册信息:所有信息验证通过后,前端将所有注册信息通过Ajax请求提交到服务器进行注册。

这个介绍仅为一个基础模板,具体实现可能会根据实际业务需求有所变化。
本文来源于互联网,如若侵权,请联系管理员删除,本文链接:https://www.9969.net/9912.html


